I seem to have an X gantry level issue that I have been unsuccessful in correcting.
Since getting the printer I have only been able to print 2 files, both were included on the sd card, the third file I cannot successfully print. Bot of these printed by “accident” as far as im concerned as they printed the first layer in a method I describe as “accidental chaos” where the nozzle extrudes filament around creating spaghetti that it somehow builds the remaining layers on and completes the print.
Main issue is that when the X gantry moves to the right it is going uphill and looses contact with the bed, dragging the extruded filament around until the nozzle comes back to where contact is made and adhesion is achieved in that area.
To date troubleshooting,
leveled the bed until blue in the face,
leveled the bed to the base using calipers and then squared the frame to the bed/base as well the upper support to ensure the main supports are square.
I have used the spacer as shown in the instructions to level the x gantry. I have completed this with motors on as well as with motors disabled.
with motors on , I can level it, however when it starts printing it looses this adjustment and the problem persists, also if you power the machine down you can watch the gantry drop about 1/16-1/8" on the extruder or left side.
If I level the gantry with the motors disabled, As a few creality videos show, it immediately lowers on the extruder side when you let go of it. Like its under tension.
It is the right side “non extruder side” that is high, I have always lowered this side to bring it down to the level of the extruder side left side. As i am writing this I am wondering if I need to raise the low side, opposed to lowering the high side? In any event, if everything is square, I shouldn’t see this 1/8" height difference from one side to the other.,
I have made the attempt to solve this myself, as first layer problems are common, but I seem to be at a loss at this point. It is my first printer, and is currently an expensive paperweight.
Any suggestions would be appreciated. My apologies for the lengthy post
What kind of printer is it? The gantry dropping when powered off “happens” if there is only one Z axis drive, you can get an anti-backlash nut to fix that. Under $10. It almost sounds like something is binding. Could be something out of square or wheels adjusted to tight.
The adjustable wheel on the non gantry side was actually loose and free spinning when It came out of the box. I have tightened it, but you are correct with the “binding” it feels like something is holding it unlevel and that force pushes back.
I will investigate the anti backlash nut you mentioned. Thank you
have you contacted tech support? Creality has poor QC and needs to have customers calling for support and get the help and replacement parts from them. You purchased a printer and expected it to work you should not need to fix a new product. This is not your fault but the manufacturers. The backlash nut might work. I hope it does but Creality needs to get control over production.
I have not spoken to tech support yet. I spoke to the technician at 3d printing canada, they advised to square the gantry and frame with a carpenters square, I contacted them again when this action yielded no better result and they advised me to get onto this forum. I will for sure contact creality regarding these issues. I understand that there are many modifications and “tweaking” required with this hobby but I would expect a better result out of box for the price. I appreciate the advise.
The 10S has Dual Leadscrews and you can manually manipulate them to bring the gantry closer to “level” as compared to the bed. The process can be a little annoying the first time you go through it but once you get it should stay relatively close.
Here is a video from Creality showing just the proper process including levelling the gantry
Always start by tightening the bed knobs to ensure you have enough room to get the Z offset correct.
It’s a very useful tool for quickly comparing the level of your heated bed build surface, to your printer frame and to your gantry as well as giving you a rough idea how flat your your heated bed is (just put it on different points and you’ll see if the bubble moves).
It also gives you additional data for talking to Creality.
Just tightening the wheel won’t necessarily help, The frame must be square to itself and the base and then the gantry can be adjusted so that the wheels are in correct contact with the frame.
Type this “Squaring the frame on an Ender 3 printer” into YouTube and it will bring up some videos on this. If it says it is for the Ender 3 don’t worry they adjust about the same.
There are many mods to correct poor design choices. Creality and its sister companies (name here 3D Technology co. ltd.) have made a lot of inexpensive 3d printers and brought a lot of people to the industry. The flip side is the poor QC, the cloned parts, the poor design choices, all have driven people from the industry. I think that they should be held to what they sell. You bought a printer and I can assume you expected it to print. There are no other industry’s where you buy something and you need to re design and re build in to get it to work well.
Evening. I have had a chance to complete the video “pro levelling ” as recommended.
I have attached a video showing the problem I am experiencing. Motors were off, holding the low side, I manually lower the high side. Once level, when I release the side I was holding , It returns to the lower position relative to the distance I lowered the high side. Like its under tension.
I had levelled the bed using calibers so that it was level to the base. When I levelled the bed with the bed levelling function I did find that the right side had to be raised considerably higher to meet the nozzle. Confirming that the gantry remained high on that side.
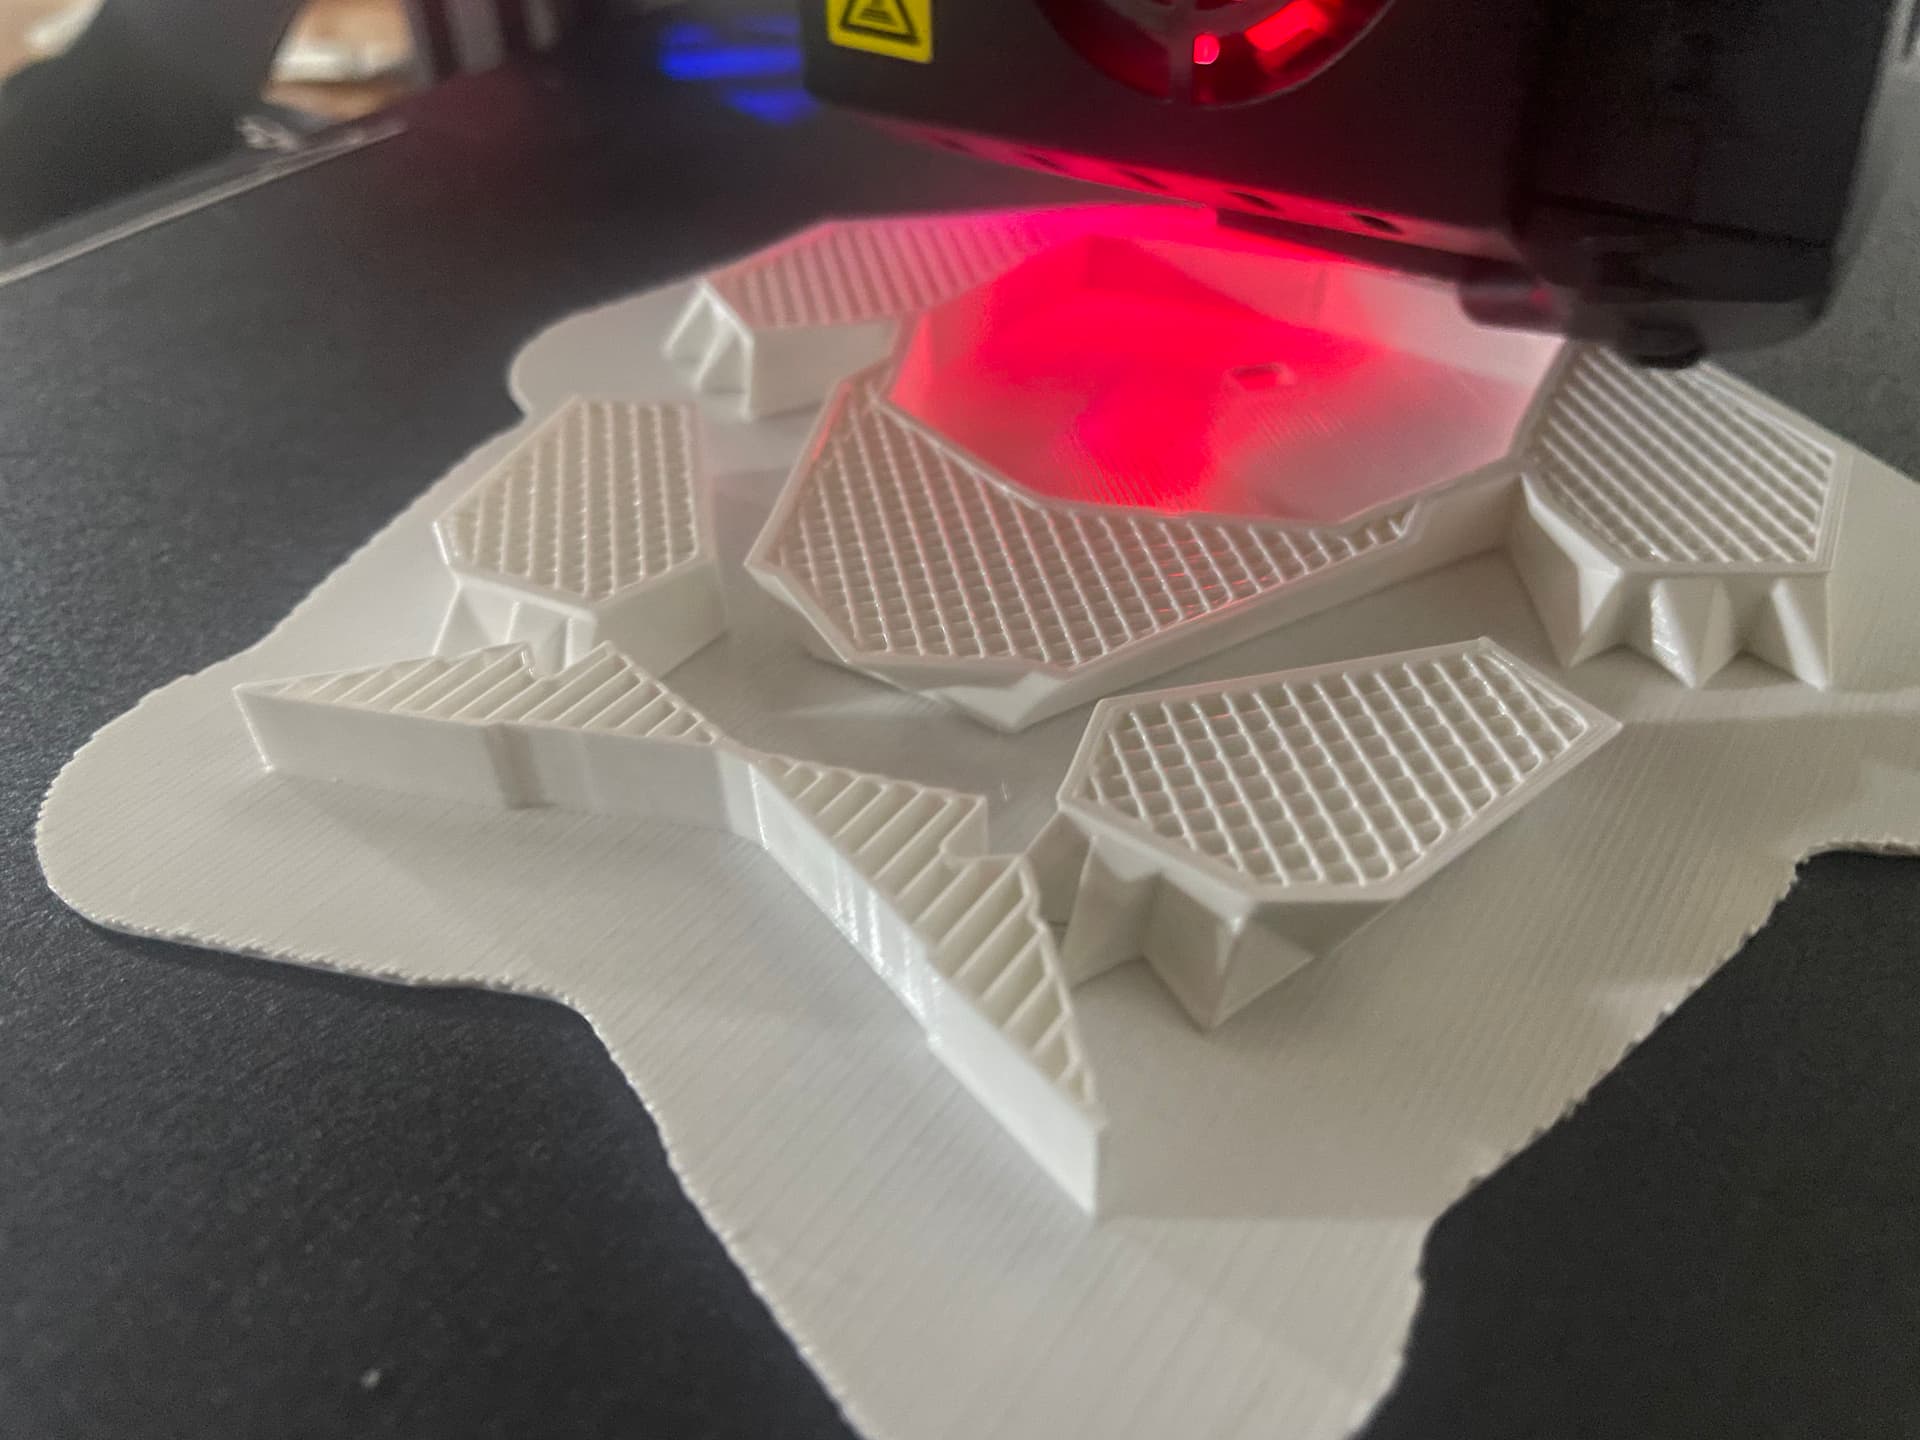
That being said I was able to get a print to start and it is currently printing. First layer required a large amount of on the fly z axis adjustment. From -1.41 to -1.91 and then back to -1.41 once it had successfully printed a solid base to work off of. Wasn’t pretty but is now progressing. Again, Im not sure what is normal and what is not, does the first layer typically require a good amount of adjustment and attention ? Image attached, print seems to be progressing well, first layer not ideal.
Second video, is this normal for the bowden tube?
Thanks again for the advise, I really appreciate it
In the first video was the printer turned on or off? I’m guessing it was on.
Is your dual Z axis driven by a stepper or a belt drive? Stepper most likely by the looks of it.
If it is a stepper drive and turned off then the gantry can easily get out of wack just by touching or moving it and cause problems but when it is turned on it should be “stiff” and not be able to do that. If the printer is on then check to make sure that the stepper (the one on the side that is moving)is actually working. I’m not an electronics whiz or even and elf so start by checking to see if it is still plugged in. After that some else needs to help, I am not much good at figuring out power/control circuits to a stepper. You could unplug the primary stepper and see if the stepper in question will still drive the gantry up and down. I don’t know if that is good or bad for the printer. Ask the rest of the forum.
As far as the boden tube that happens and is not so good, it screws up the retract movement amount. If you are still using the connectors that came with the printer you can get better ones that will minimize or stop that movement. It is a bigger problem when it happens on the hot end.
The printer was on with the motors disabled.
I tried another print and ended up with nothing but a mess. So I went around the machine and checked everything. The plug for the motor that is low felt slightly loose. When I say slightly I mean that I cannot say for sure that it moved or not.
I adjusted the gantry again while it was turned off and immediately sent the same file to print, it seems to be printing correctly and the gantry seems level.
When this finishes printing I will check it all out again, but it seems to be working.
When printing a raft, the printer will lay down layers of varying thicknesses? It seemed that t was adjusting this thickness depending on the layer it was printing, thinner on top. Is that correct?
You can set your slicer to print a heavier first layer then the rest and your an also set the line width to be thicker on the first layer. I don’t know if that is what you mean but it might look like it was printing like you said.
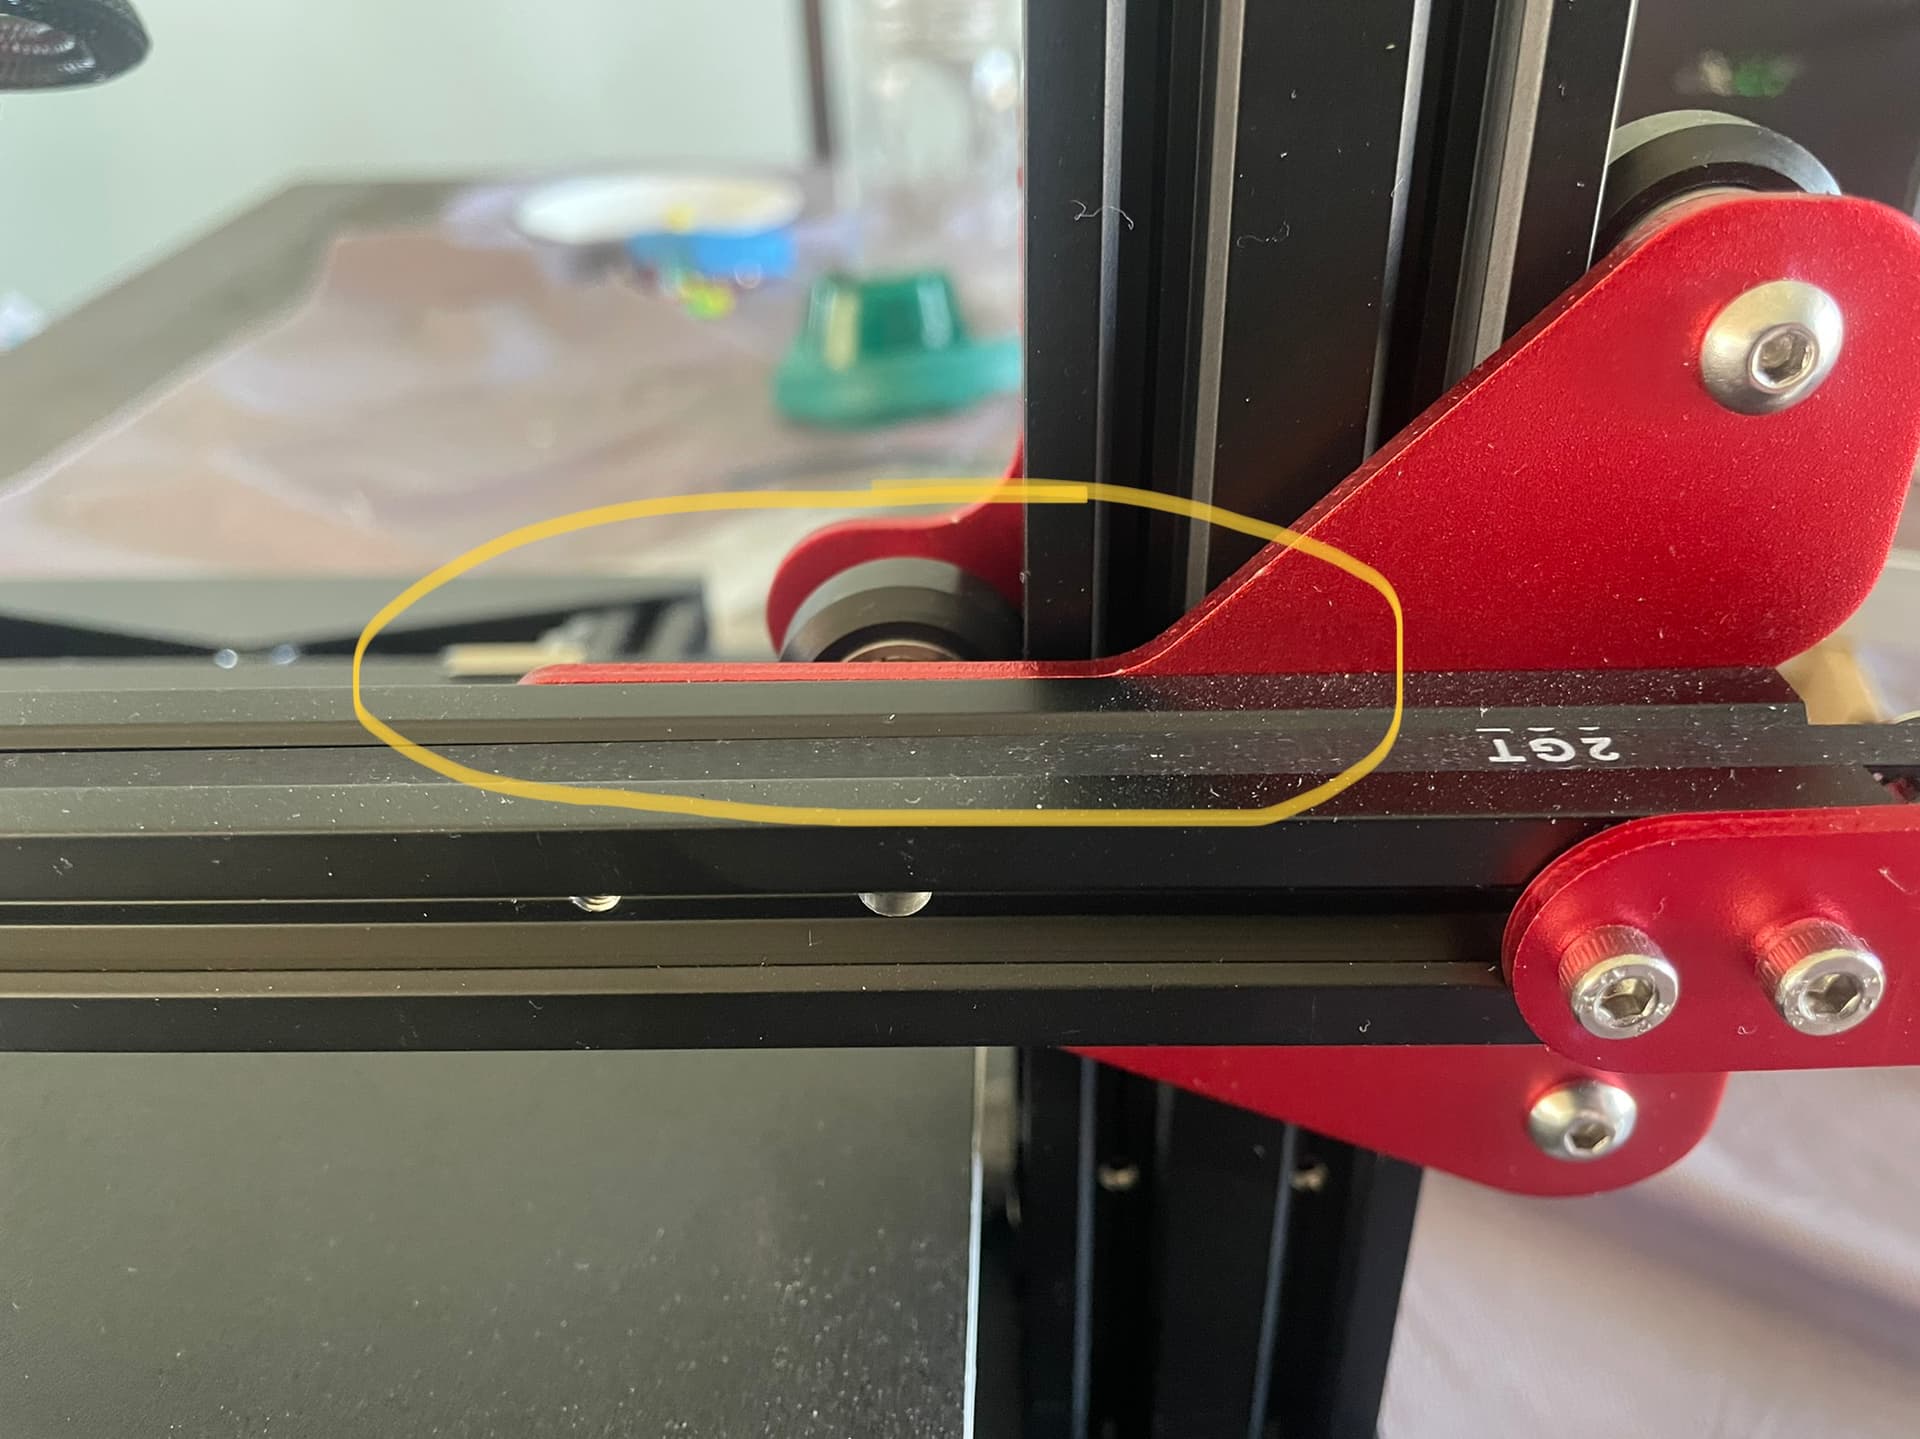
It looks to be like the Gantry is bolted on an odd angle. (not completely flush) I know going to be a hard one to explain.
The 2 brackets on either end have to be Tangent to each other, It looks to me like one of the brackets is tangent to the extrusion but the other end is bolted at a bit of an angle. I am going by memory but I believe that the brackets are bolted to the extrusion with 2 bolts on each side, If you are able to loosen the bolts and then square the gantry as you did in the video. With the 4 bolts lose you should no longer see that “spring” action as depicted. Now once the gantry is roughed in place you can start to snug up the 4 bolts checking to ensure the tightening of the bolts doesn’t throw it out of wack again.
I run into this fairly commonly on the larger printers where I assemble the bed frame from multiple pieces and you really have to assemble them on a flat surface and check with every bolt nothing has moved.
Ok, if I am understanding correctly, the red bracket is not fastened to the black gantry frame that the hot end travels alonge?
In the photos, the thin red edge needs to be lined up with the black horizontal frame.
Is this what you are referring to or am I way out to lunch in my comprehension?
After much trial and error and exploring all of the advise and recommendations from members I believe that I am on the right tract again.
Seem to be able to get a terrific first layer, great adhesion and have successfully completed a 25hr print along with various shorter prints. A better understanding of the cura software and it settings and how they impact the printing has helped as well.
I really appreciate the advise and help with this, it seemed to be a combination of issues.