Ender 5 + bizarre printing problem / Lemon printer?

Hi, I have an Ender 5+ and I greatly regret buying it. I have had endless issues with it and I see online I’m not alone in my struggle. Since I bought it i upgraded to a direct drive…which fixed the first issue of repeated clogging and jamming.

I bypassed the filament sensor because at least 50% of the time it would pause but not restart when the filament was replaced

Then I had issues with a warped glass bed…I replaced this with a flexible magnetic bed.

I have tightened the eccentric nuts after discovering that the extruder assembly was wobbling and loose and tightened the belts.
It printed for a while but not without some odd warping…

I recently brought it in because when i was trying to fix a clog one of the small screws on the extruder stripped and had the extruder replaced…they replaced the Capricorn tube, reconnected it all through the filament sensor resetting the firmware and it passed the test of a small print in the shop.

THEN I brought it home…i was busy so didn’t print for a few weeks…first print - as it was doing its home/level it broke off the pin for the BL touch…odd nothing like that had ever happened before. I ordered new pins and replaced them.

Tried to print…nothing sticking…so i releveled the bed only to discover that the wheels on the right side (front and back) would move but the bed did not raise or lower…the springs were jammed? SO i replaced these with the silicon spacers and new wheels. Carefully releveled the bed and looked great…

It printed a really nice first layer and after an hour stopped extruding…no idea why. Just stopped.
SO I bypassed the filament sensor in case that was glitching or creating too much drag. A HA! worked…for a few hours longer…and then again spontaneously stopped extruding after about 7 hours.

At this point i was ready to give up…

I cut the capricorn tube back to how it had been PRE repair when it had actually worked. This seemed to fix the issue. Printed first level well and did not stop extruding…finished the entire print.

sigh…the finished product was brittle and pulled apart…Underextruding…I cleaned the extruder of clogs and replaced the nozzle.

test print…same issue no better at all.

I checked the Esteps (of note when it was stopping printing it was still fully extruding up to that point) the esteps were WAY off…i mean way off. I corrected the esteps and did a test print. Extruding wonderfully now.

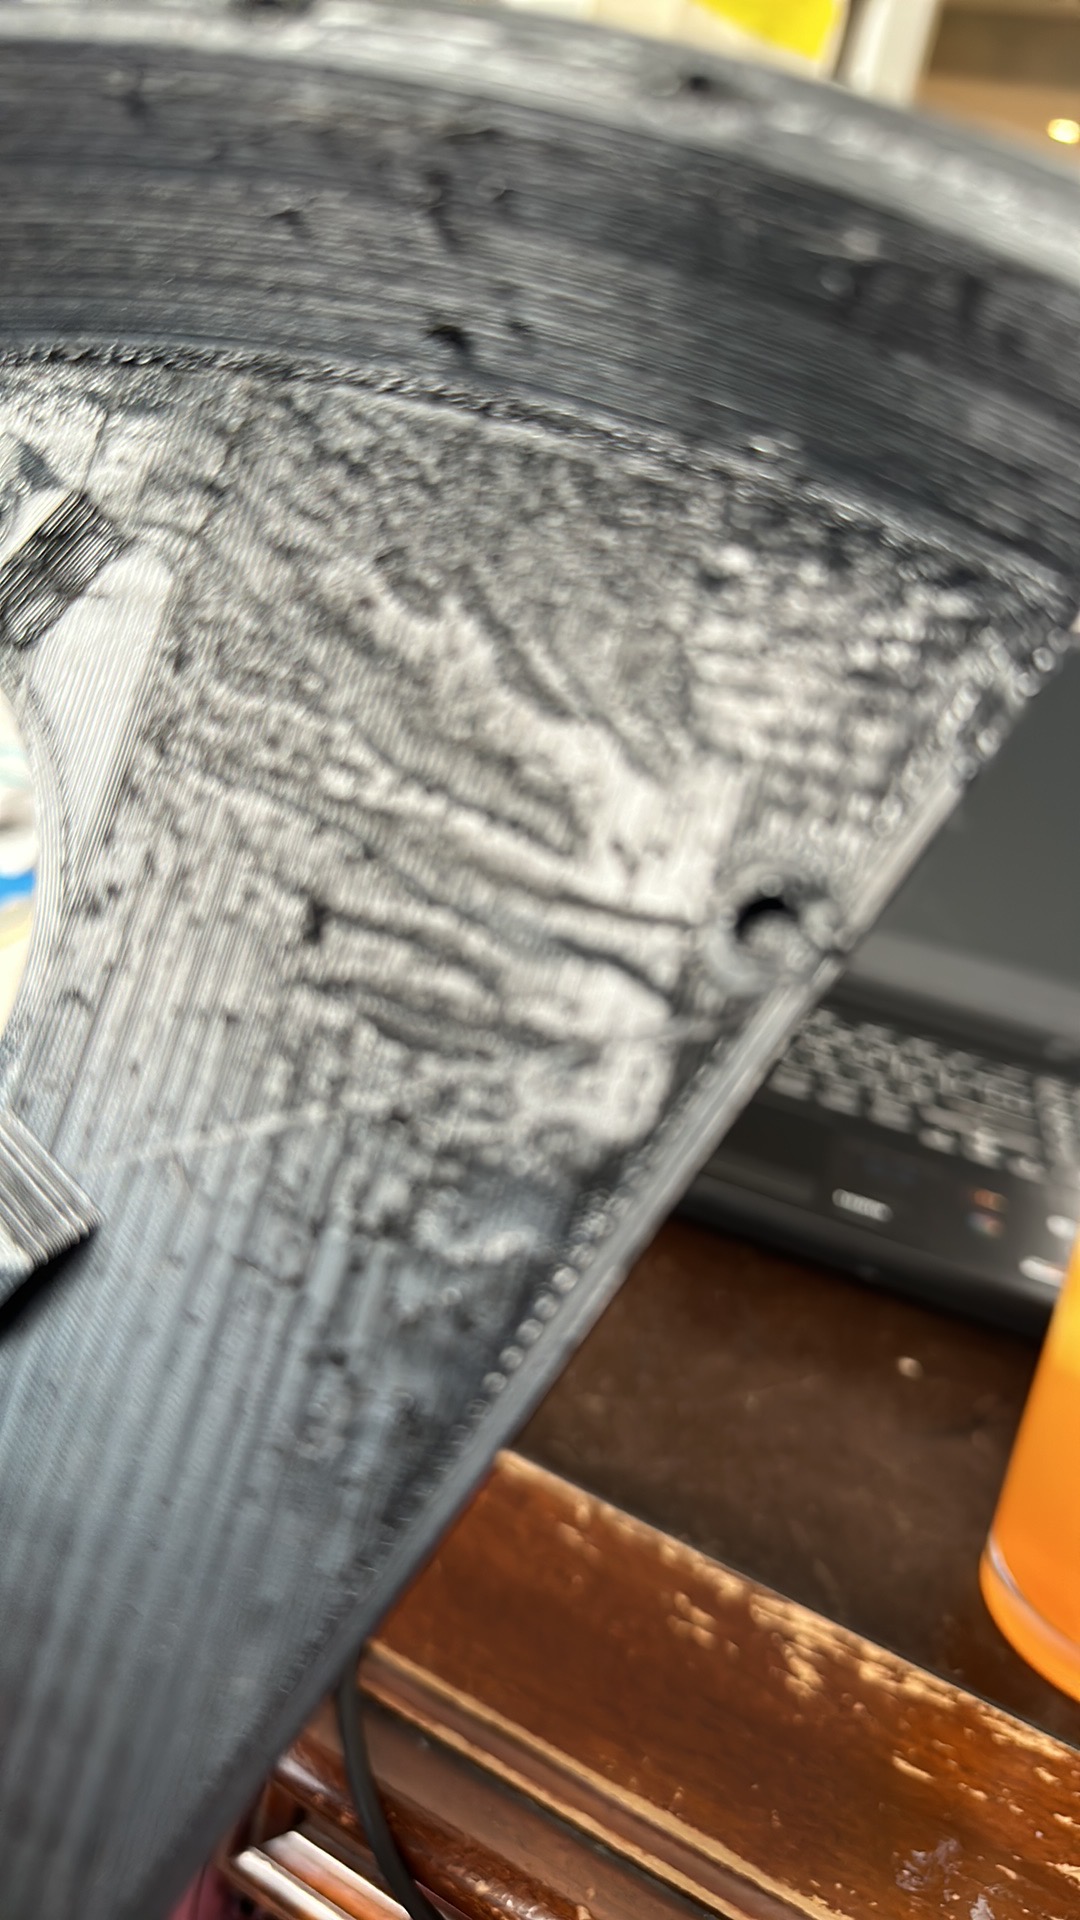
So I attempted once again to print…it printed a beautiful first layer…looked promising but at the end of the print I have this issue…wth? why is part of the surface so warped?

Petg
Print temp is 240, bed temp 80 first layer then 70. New filament roll
extrusion multiplier .9 (as recommended by shop)
retraction length is .6mm
retraction speed is 45mm/s
I checked the nuts and belts they are good.

Room has no drafts and constant temp 19/20.

I am at the end of what I can do…i’m reluctant to bring it back in as I have already sunk so much into this printer and it was actually working better before it was repaired than it is now. After 2 years it’s functioned well MAYBE half of that time…even when it was i still had some odd warping…

This is what it printed last night…


Hi Hawleyk

If we miss something on service we warranty what work we perform. Ordinarily, it would be a problem because it’s been a while since it was here. If I can see the notes and it’s a related issue we will cover it not an issue.

Can you DM me your invoice number and let me see exactly what was done with it?

I have my Ender 5 Plus here in the shop (it lives on my desk) I print on it almost every day. Are you able to send me your Gcode file I’ll print it on my printer and see what it does here.

Please bear in mind I am going to be in MN for all of this week so I will have limited access to printer and forum. If you can extend me a little time I will help you get through it. I will start the print today if you are able to send me the Gcode file. Send it to support@3Dprintingcanada.com put attention Jason in the subject line and I will get it.

@hawleyk That is really frustrating. I am sorry for the annoyance you are experiencing. I can attest to how difficult tuning a printer can be. It appears to me like there is still a first layer issue, maybe, typically ‘orange peel’ is from something with the early layers. Is the print warped a bit ? This could also be a cause.

I typically print PETg 230/240 but I run my bed 85-90.

Enclosures help, sorry, the ambient I run with Petg is 26-35 You could try a small test print and use a bag over the printer. DO NOT LEAVE IT if you do this. You need to baby sit the print the whole time. In case it goes sideways.

I am going to make an unpopular comment. Many 3d printers on the market are suffering the race to the bottom. Many are cloned from other designs, then to get a low price point cloned parts are added. In some cases the cloned parts are super poor quality. It is tragic as it creates a huge amount of frustration. I have twice now decided that the constant tinkering, and new parts to fix something that should not be a problem has not been worth it and cut my losses are bought a better printer.

Everyones finances are different but I have a 600$ printer that has 800$ of changed parts (or more) and 100+ hours labour and produces ok to poor prints and is 50/50 at best for a print to complete. It is no longer worth throwing good money after bad. I replaced it with a better printer and never use it anymore.

I say this because I went way too far down the rabbit hole with mine. I wish rather than chucking more and more time and money at it I had decided to cut my losses and buy something better. There are printers that are reliable and don’t need tons of mods just to get them to work.

1 Like

Hi, I thought the first layer looked good…tbh one of the best i’ve seen it look in a long time. I do have en enclosure and will try printing with it all zipped up.

My Prusa is a workhorse and has been incredibly reliable…it has had some issues of course but no comparison between the two.

Thanks

It really does look like warping. The layer looks compressed and orange peeling is in my experience is from a layer not being level either tramming or warping.

From your story, I can see some very common frustrations that people experience. Hell, I’ve had them as well. I’ve had and use printers of all types, including an Ender 5 Plus. It’s an odd machine, but most of the problems I’m seeing you’ve struggled with are likely from oversights in the troubleshooting processes. There are specific steps to take to address each category of issue, and it seems that attempts at solutions have outweighed determination of root cause. It’s super common, because it’s a lot faster and easier… when it works.

  1. You’re right, comparing a more finely machined traditional bed slinger like a Prusa to a machine that’s halfway to a corexy is not ideal.

  2. Large beds take a lot more fine tuning to properly tram and keep stable. Replacing the bed may or may not have been necessary. In my experience, it’s usually not, but textured/powder coated spring steel is an upgrade imo anyways.

  3. If something doesn’t stick to the sheet you’re using, especially PETG, soap and water scrub is most often the fix. Finger oils plague these, and they need to be cleaned before first use, and regularly in between with IPA.

  4. Capricorn for a reverse Bowden (direct drive with a feeding tube) is actually worse, especially if it’s the XS Capricorn. It’s restrictive, which is good for a push system, bad for a pull system. And XS is the most restrictive. Use the cheap sloppy stuff for that, or at least the regular Capricorn tubing.

  5. Consider your materials. PETG likes a larger z-offset and sucks up moisture very easily. If you aren’t keeping it dry enough, nothing will print well. If you’re too close to the bed, you’ll get ripples, drags, and artifacts all the way up when you get filament stuck to the nozzle. And yeah, the nozzle should be kept clean and shiny for PETG.

  6. V wheels have their own issues, especially when cheap, more so if left to sit idle. They get flat spots when not moving, and bind/wear quickly when not properly adjusted.

Overall, I would recommend taking a step or two back and start with one specific issue, then follow the sequence of troubleshooting/calibration steps needed to root cause/address that one issue without changing any parts, only adjusting one setting at a time, and not skipping anything.

Start way back with squaring the frame, checking tensions, cleaning and lubing z rods, tramming the bed both square to the frame and parallel to the gantry. Then do a very patient level, repeatedly untile variance between points is as close to gone as possible. Then do bed leveling at temp. Then IPA the surface.

Next, do your e step calibration, PID tuning, and try to get a good first layer on one filament. This is where you can start adjusting your flow in the slicer. No, e steps and flow rate are not 1:1. I have my (well rotation distance for me) dialed exactly, but some filaments at only 89% flow rate. Then test your cooling towers, temp towers, and finally a real test print. It’s a lot of work, but probably a lot less than what you’ve already been through. Eliminate mechanical issues first, then material issues, then tuning.

update : I finally found out what was wrong with the printer…its very odd but apparently a known issue with Ender 5+. Someone online helped me out and once i fixed it I had no more problems.

The ender 5+ will slowly lose level on one side…the threaded rods on the sides that raise and lower the bed will eventually slowly come out of sync/level. If you precisely measure the distance from the printer to the bed on each side you will see one is off by a fair bit after a while. If you hold the base knob of the lead screw on one side while slowly adjusting the other you can get them back in level…may need to relevel the bed but then it will fix this issue i kept having.

Might need to redo the whole level after that but so far most times i just need to correct that.

It will keep doing it every few hundred hours of printing…not a great feature and not one anyone had told me about b4.

thanks for all the help, hope this helps others…

thanks for the update. I found an old 2.2 board that had an E1 port on it but no stepper driver. I soldered one on and redid the firmware. Surprisingly it worked not an issue. Now I run the G32 at the start of every print so it auto trams every time before it does its G29. If you were really adventurous I believe the BTT Mini E3 V3 has a second E1 port you could do one up very easily to operate the 2 Z motors independently.