I’m hoping that somebody here has some ideas about what I can try about reducing blobbing on a print using Igus I180 filament for a structural part with an integrated optical rod bearing (I180 has solid lubricants built in and is sold as having good wear resistance against moving parts):
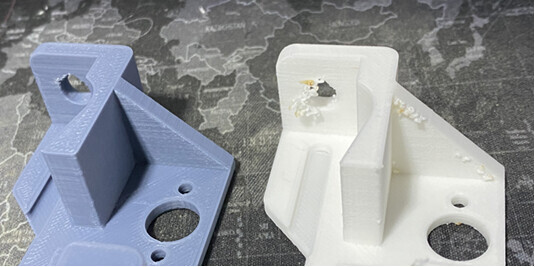
In the images below, the white material on the right is I180 and the grey is basic ABS, both done on the same printer with basically the same printing parameters but the I180 produces a fair amount of blobs whereas the ABS has virtually none.
In trying to get the best possible prints, I altered the following parameters:
Nozzle Temperature
Bed Temperature
Infill
Layer Height
Retraction
Extrusion Factor
Print Speed
Coasting (Specified in Cura)
Pressure Advance (Klipper Feature)
The only thing I didn’t try (because I don’t currently have the capability) is a heated chamber but I don’t feel like that would contribute to the blobs. The blobs were quite constant throughout the tests except when I reduced printing speed by 50% and they became considerably larger.
0.08mm layer height (I found that there was layer separate at larger layer height values)
Retraction 0.25mm
Extrusion Factor 80%
Print Speed, 20mm/s bottom layer, 50mm/s for all others
Adhesion: Elmer’s glue stick on PEI (I tried 3DLAC on a glass plate and Elmer’s on PEI sticks just as well and is easy to clean up with Isopropanol)
No part cooling
No coasting
Pressure Advance as setup according to the Klipper instructions for I180
For the ABS piece, I’m running with:
230C nozzle and 100C bed temperature
60% infill
0.08mm layer height (normally I’d run 0.2mm, but I wanted to make it the same as the I180 test)
Retraction 0.5mm
Extrusion Factor 80%
Print Speed, 20mm/s bottom layer, 50mm/s for all others
Adhesion: PEI
No part cooling
No coasting
Pressure Advance as setup according to the Klipper instructions for ABS
The I180 doesn’t feel as rigid as the ABS but it seems to be adequately strong and dimensional accuracy is good. Other than the blobs, the only issue I had with printing was layer separation when layer height was 0.2mm and I brought it down as this reduced layer separate to basically nothing.
The blobs come off with a fingernail so they really aren’t an issue, I’d just like to understand how to print without them.
It’s been suggested to me to change Wall Ordering and I’m running a print with that right now.
Any other ideas what I can do to eliminate these blobs?
might be the end of a non-print from the right side maybe?
My gut feeling on it is because you are not using part cooling you are generally printing in a very similar way I print PETG. I get this on my PETG parts really commonly when I am about 5 deg too hot for the filament.
I noticed this originally when I was printing parts out of my print farm with white and Black filament. Same slice same temp. My white was showing this all over the place and my blacks were perfect.
I decreased the temp on my white and poof, the problem went away. Although I am not familiar with your filament the symptom is almost exactly the same. You can clean it up real easy if you look really closely it’s actually just a tiny whisp of filament holding the blobs to the printed part.
After running the video on my print and spending way too much time figuring out the problem here is what I found was going on in my situation. In the travel move, there was filament “dripping” out of the nozzle, it would drip just a mm and because the part cooling fan was off it was actually still molten when it passed over the next part and kinda dropped off onto it. (like an ooze shield). With subsequent layers it would drip more and more filament onto the lower layers and if you noticed your blobs should look like they are building on 45deg angles until they touch the part again and build out again in 45 deg angles.
Long and short the filament is just a smidge too hot or you can turn on a 15% fan to cool it fast enough that it does not drip. Makes sense that you say when you slowed it down problem got worse as you would be able to ooze more filament during the non-print move. If you want to immediately test the theory you could bump the retractions and it should reduce it also.
Just saw your pic and yes the angle you are seeing does match the opposite part on your print. Its more than likely a similar cause to what I mentioned above.
Unfortunately, there was a real problem with adhesion, something I was worried about due to the fan being included in the print and even though it was started after the 3mm base layer was put down.
Cura has an option for “Alternate Wall Directions” and I’m wondering about filleting the triangular rib so there isn’t a hard edge that I might try but I think this is something I’m going to have to live with (at least until I put together a printer with a heated chamber and I can restart experimenting).
Did you buy this filament direct from Igus or from a local vendor? I am need of some this stuff or something with similar abrasive resistance in a hurry.
I ended up getting the I-150 (bit of a rigmarole to purchase… between pricing and availability) and it worked out for my application. The stuff definitely requires a bit of tweaking as it was stringier and gets more blobs than ABS. I didn’t have much time to fiddle but I printed without fans in a chamber with my heat settings on the high end of what the manufacturer recommends.
This is a functional gauge for checking clearances. The main body was printed in PLA with the wear components (2 bolted plates and swivel block) printed in Igus I-150.
Orbiter 2 direct drive with Slice Engineering copperhead on an Ender 3max.
nozzle -250
bed -60
chamber 30
no fans
retraction 1.5 @ 60mm/s
8 layers top with smoothing
20% infill
print speed 60mm/s
Magigoo on glass bed
I believe Cura has some Igus material profiles in the marketplace but I just adjusted my ABS profile (bed 110, chamber 50).