Tensile Tester Mounted on Lathe

I purchased a force gauge from Amazon.ca that reads to 500N (50 kg. or 110 lbs)… By using leverage with a 2:1 or 4:1 ratio, I can get up to 440 lbs. to test tensile strength…

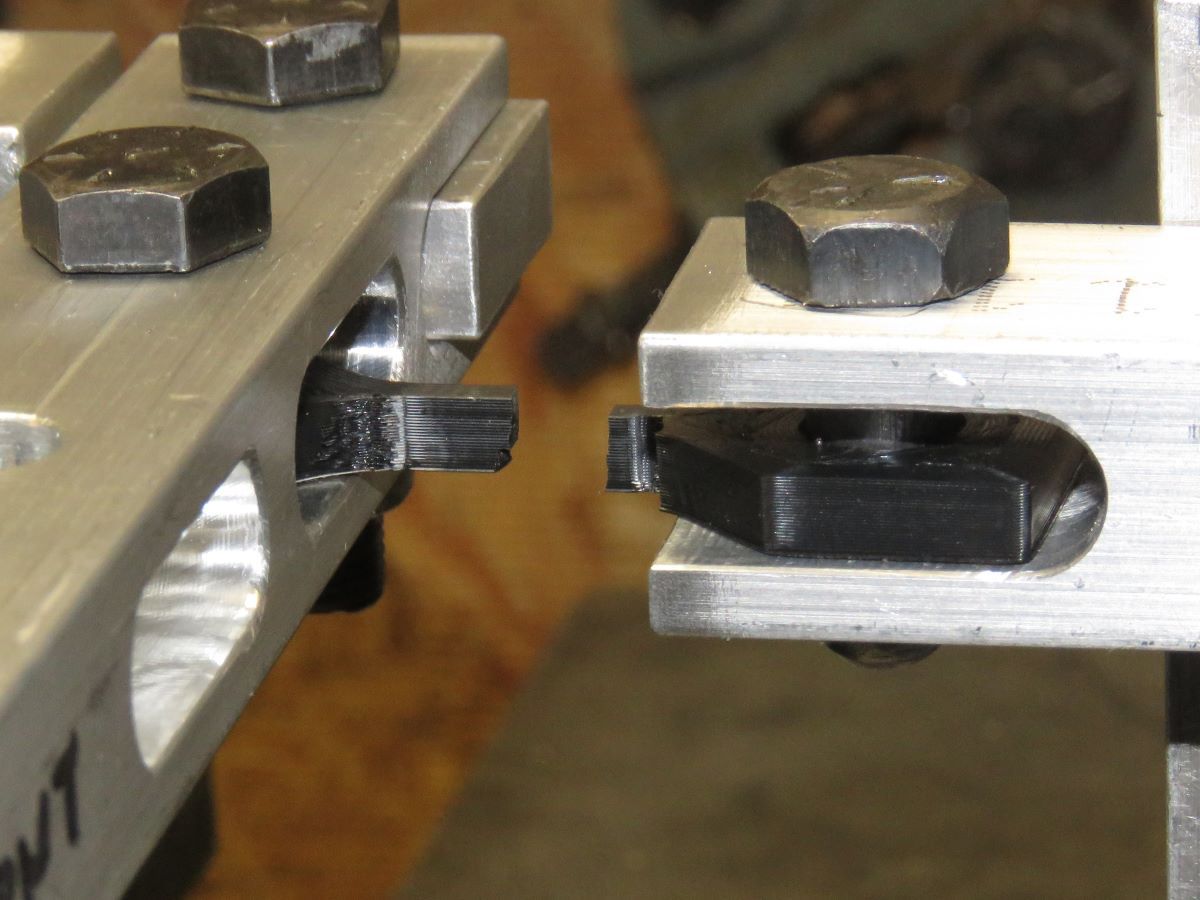
Yes, it’s mounted on my lathe!.. By using 45 RPM and 0.0044" feed per turn, I get 0.198" per minute, which is within a whisker of the 5mm/min. pull speed that is the standard for tensile strength tests (according to the internet)… The main part is mounted in the “T-Slot” on the carriage, by removing the tool post and turning the compound feed parallel to the bed… I move the carriage so that I can get the test coupon in place, drop in the 3/8" quick pins (cut off bolts), engage the half nuts to the lead screw, and then back the compound feed out until the force meter just moves… Flip the switch on the lathe, and it pulls at constant speed until the coupon breaks… I have the force meter set to read peak force, which it holds until you can write it down, and prepare for the new test… Here is the broken coupon, still in place…

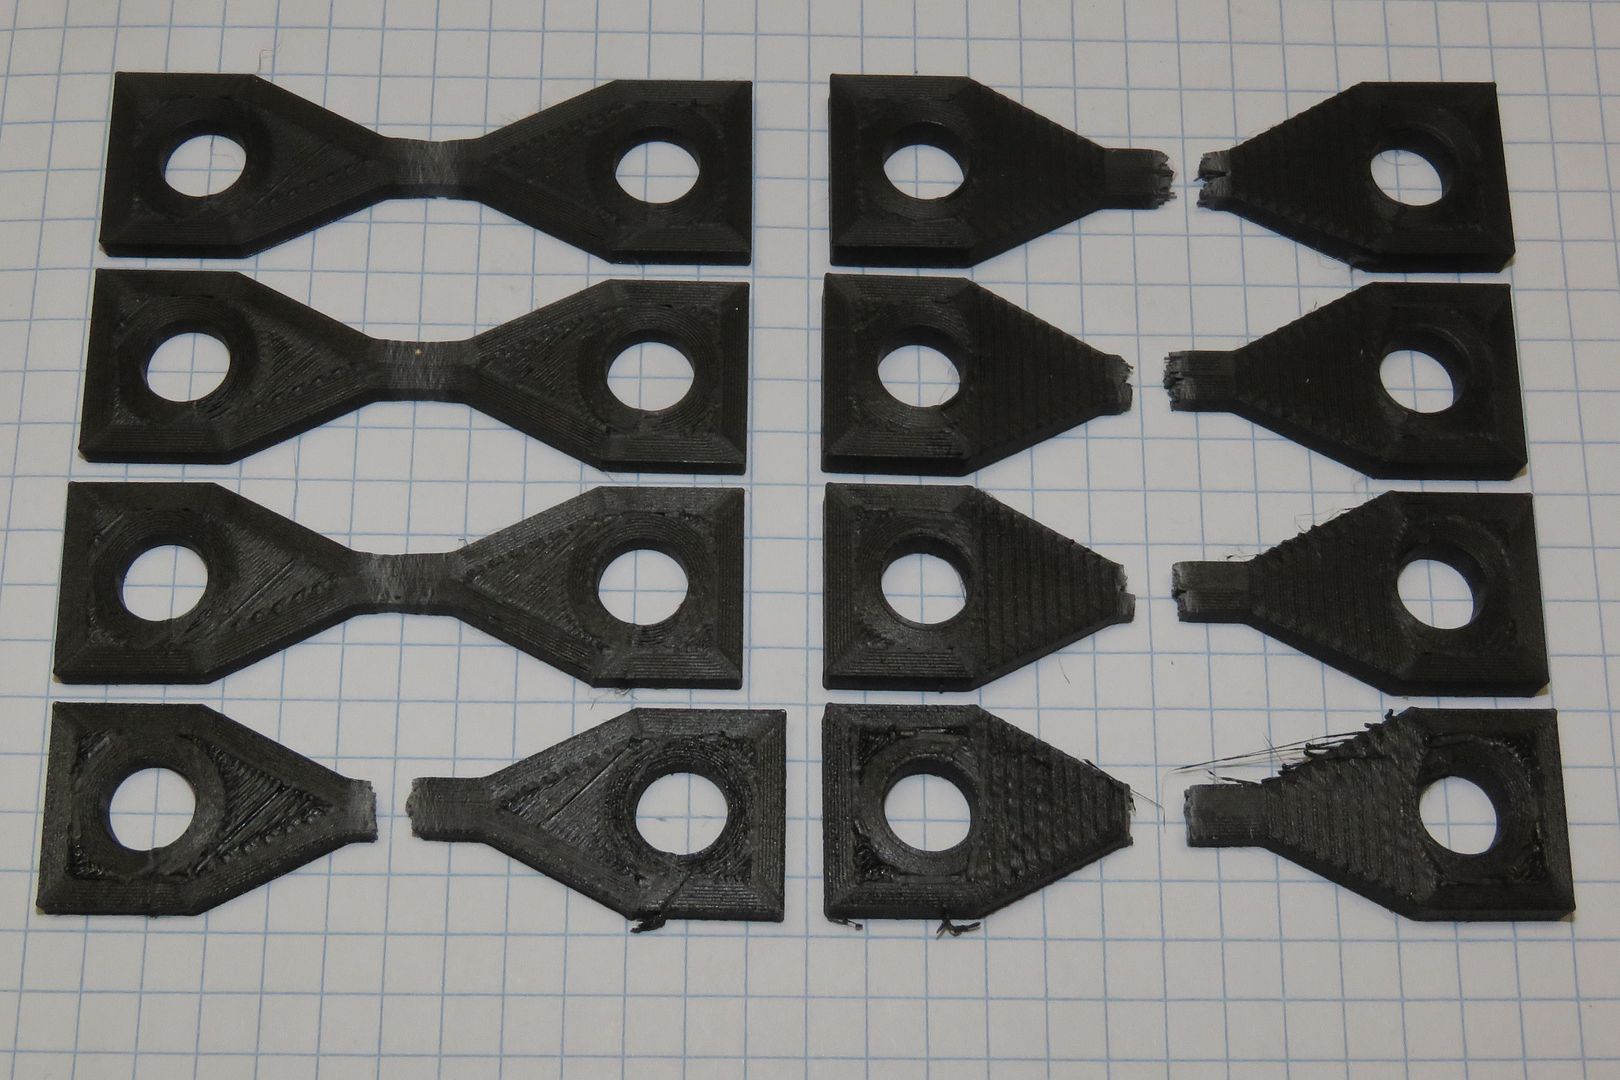
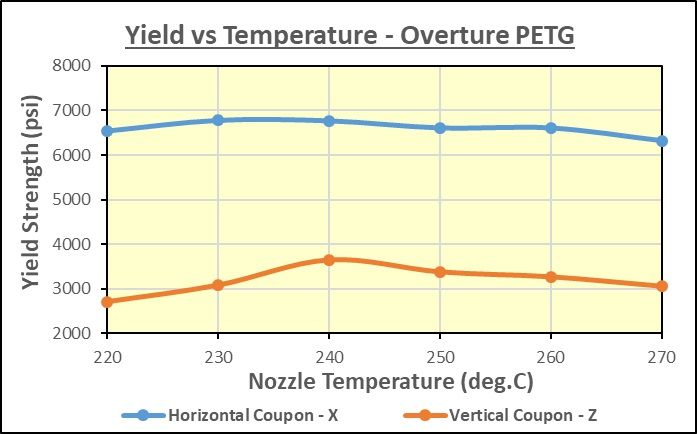
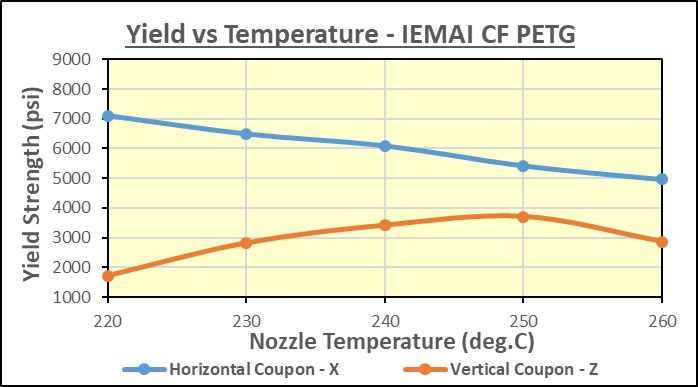
The fixed mount is bolted to a vertical aluminum bar (3/8" x 2") which is bolted to the bed below the lead screw, resting against one of the cast iron cross webs… I used the 2:1 position for testing a “Z” sample (layer strength, about 2400 psi), and the 4:1 position for the “X” sample, where the filaments are running the length of the coupon… It broke at just under 6500 psi… Here is a photo of the coupons…

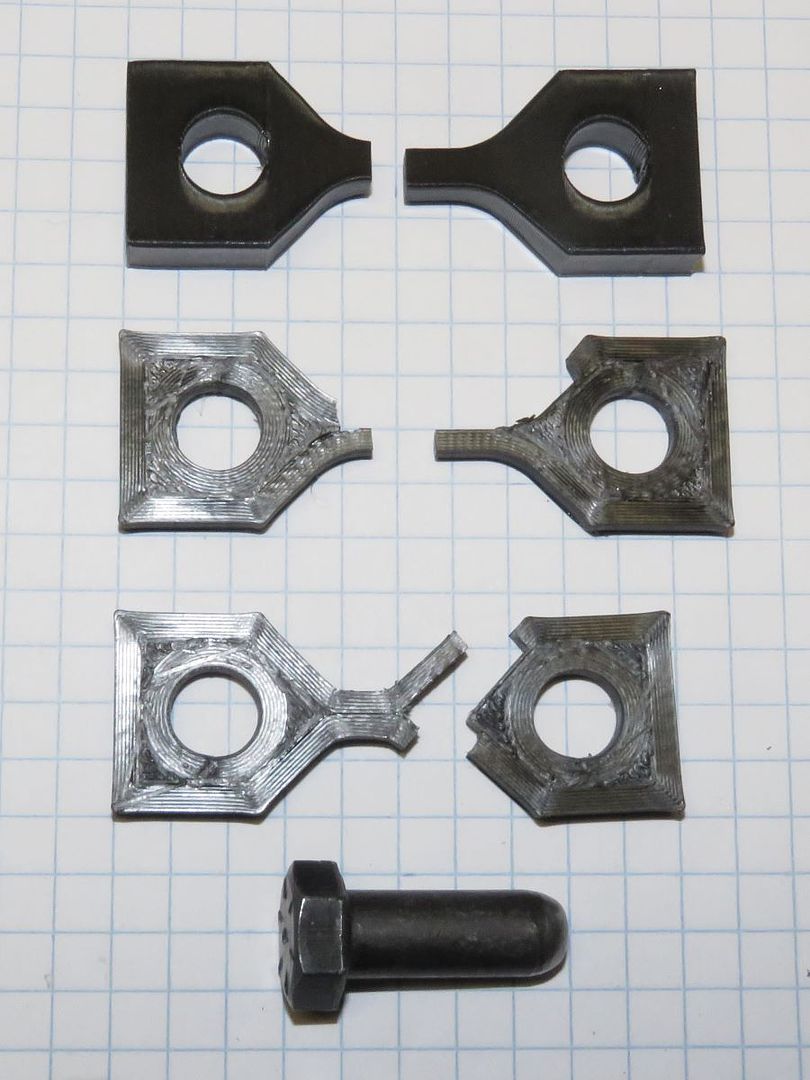
The top one, the “Z” test failed exactly as it should, between the layers in the narrow test section…

The middle one was the current design of “XY” coupon, and it failed in the middle, but a piece blew off one side…

The bottom one is the original “XY” coupon, and it failed by delamination in the 45 deg. angle portion, rather than in the test portion… That was the reason for the design change, and it appears I may need to make it even longer, with shallower angles or a larger radius…

All in all, I am VERY pleased with how it works…

Bob

3 Likes

Looks great!

Thanks for sharing, I have been looking into something like this so that we can provide filament specific graphs for each of the materials we sell here.

I’m afraid this setup is a long ways short of being able to do a stress/strain curve… It only records peak force (usually just before break, but sometimes the coupon stretches a lot, with the peak force being the yield point)… To graph stress (force) vs strain (movement) you need a way to read the distance and force as a function of time… That requires significant automation of the process…

Bob

I have been working on fine tuning the coupons for consistency, and I have a couple of sets of data that I feel confident with and I thought I would share with you… I have my force meter set up to record the peak, and most samples break soon after, but in some the peak occurs at what would be the “Yield Strength”, where the coupon begins to stretch, but may not completely break even after another 30 seconds… So, using the peak force and the area of the test section (which is now 5.6mm wide and 4mm thick), I can calculate the yield strength, and by printing coupons with different nozzle temperature, I can create a chart showing how the printing temperature affects the strength… Here is such a chart for Overture brand PLA (grey)…

Here is a similar chart for their “Econo” brand PLA (black)…

As you can see, the Econo PLA is only about half the strength of the regular Overture PLA… As is typical for PLA, it is the strongest when printed quite hot, in this case 230*C for the regular Overture… The “Normal” coupons are 4mm thick throughout, but I had a few earlier versions fail through the eye, so I also made some with 5mm thick ends, but since I reduced the test section to 5.6mm wide by 4mm thick, I have had no coupons break except where they should…

Bob

The coupons are acting as they should now, so unless I see a problem, I won’t bother with more photos… I will just give the results graphs…

I have read that reducing the cooling can increase the strength on PLA, so I tested that out… I picked a temperature, and then starting with the data from the coupon I had already done (at 100% fan), I reduced the fan speed to 80%, 60%, 40%, 20% and zero, and plotted out the results… When I used 230C nozzle temperature, where the Overture PLA was the strongest, the strength dropped slowly as the cooling decreased (instead of increased!)… When I thought about this, it made sense, as increasing the temperature above 230 reduced the strength… So, I dropped the temperature back to 210C, where the strength was the lowest, as shown in the chart above… Now, I got an initial increase in strength, as shown below…

The strength peaked at 40% cooling, although I did not try 50%… The Yield Strength was in between what it was when this PLA was printed at 100% cooling at 220 and 230 deg… so yes, you can increase the strength of PLA by reducing the cooling, but only if you are printing at a lower temperature than what gives the strongest print at 100% cooling… This makes perfect sense, and may have some applications, where your appearance (particularly stringing) is suffering if you print at too high a (cosmetic) temperature to get the highest strength… I realize that this is a data set of “one”, but I won’t be testing different cooling settings on a regular basis…

The first PETG tests are on the printer, so stand by!..

Bob

1 Like

Keep em’ coming, I am very invested in this!

I was looking at your dog bone shape and the fracture of the second and third samples. I wonder if the hard corner has created a stress riser ? Both failures seem related to the corner.

Do you think that is possible?

The second coupon does not have a sharp corner, but the bottom one does… Those are both printed in the “X” direction… I have redesigned it with a 2:1 taper (instead of 45 deg. = 1:1)… and the test section is now 5.6mm wide by 4mm thick…

They are now mostly failing in the parallel test section… The ones on the left are 4mm thick for their full length… The ones on the right have a series of 1 layer thick steps from the test section to where the hole is, and from there to the end they are 5mm thick… I didn’t know if the 4mm ones might break through the eye, so I tested both… Interestingly, the 4mm thick ones took longer to break, and tended to stretch after yielding (peak force) without breaking for another 2-3mm… The 5mm thick one broke right after the peak force… I’m guessing the coupons have different elastic properties… The 5mm thick ones tended to require a bit less force to break at the strongest temperature…

Bob

Yesterday and today I ran the tests on Overture PETG Gray… I did both the Horizontal (X) Coupons and the Vertical (Z) coupons… I used both the thin and thick ended horizontal coupons, and found so little variation in the results that in future I will only use the ones that at 4mm thick throughout, as they print a bit faster… Here are the results…

The vertical coupon showed a greater response to temperature change than the horizontal one, which varied only a small amount with nozzle temperature… However, both were the strongest at a nozzle temperature of 240C… The bed was at 80C, and the cooling at 60% for all tests… All the vertical coupons broke suddenly near one end of the 5.6mm x 4.8mm test section, where the 45 deg. taper started… All the horizontal coupons yielded at the psi’s given in the graph above, but all of them (both thick and thin) continued to stretch in the area of failure for 30 sec. more, at which point I stopped the test… They all yielded and stretched somewhere in the middle of the 5.6mm x 4mm test section… The PETG is about 78% of the Yield Strength of the Overture PLA, but once it yields, it resists breaking immediately… I now have a standardized test which I will use in the future, unless some filaments (such as Carbon Fibre filled) exceed the capabilities of my setup with the horizontal coupons, in which case I will thin up the test section…

Next up will be Wood PLA, and I have to go back and test the vertical coupons with the Overture PLA… It takes about 2 hrs. to print one each horizontal and vertical coupons, and another half hour to break them and record the data, times the number of temperatures I test (about 6)… Realistically, that works out to 2 days for each material, and uses about 100 grams of material (about 33 metres) to run one set of tests (assuming no failures)…

Bob

OK, so yesterday and today I ran some iSanmate Wood PLA+ that I had, and the 20% wood filler certainly weakened it… Here are the results…

Interestingly, the minimum temperature recommended on the reel of 190C produced the strongest horizontal (X) coupon, but at that temperature the layers were not at all bonded well, and the vertical coupon failed at only 1260 psi, and when it did, it failed in two spots!.. The strongest layer bonding occurred at about 210C, and at that temperature this Wood PLA+ was less than half the strength of Overture PLA… It’s great for appearance (but strings at over 210C anyways), but not very strong…

Bob

I got a chance to go back and test the Vertical (Z) coupons with Overture PLA this evening, and plotted them along with the previous Horizontal (X) curve… Here they are…

The vertical Yield strength peaks at 220C, instead of the 230C for the horizontal Yield… at about 57% of that for the horizontal at 220C… I am extremely pleased with the consistency of results I am getting with my coupons…

Bob

Excellent work Bob, really interesting thread to follow. Have you tried annealing test pieces?

Not yet, but after I have a database of the filaments I have to test, I will consider it… I am also going to be testing thread strength in solid samples (all walls, no infill)… for a specific requested thread (1/2"-20)… While talking about requests, I am willing to test filament samples submitted by others, on request (I don’t want to get swamped)… It takes me just over 100 grams (~35 metres) of filament to do a set of X and Z tests, and about 2 days of printing, breaking and documenting… If people want to send me a half/part roll (on a spool, no loose filament, please), I am willing to test it… I have an Ender 5-S1, so should be able to print most materials (but I don’t have an enclosure to retain heat)…

Bob

I must say I envy your methodical approach and look forward to seeing how your testing goes. I’m more of a try it and see guy but I did have a go at annealing pla and petg a couple of years back and remember it did appear to help with heat resistance and was harder to break. Keeping the part dimensionally stable was difficult with just a standard oven but might be ok with crude prints or something that will be machined afterwards.

Interesting stuff though.

Thread testing done, so back to testing the filaments I have available… Today it’s Anycubic Silk Silver PLA…

The curves are very flat from 210-230C, and while the X-direction strength is pretty good, the layer to layer bonding is quite poor…

Bob

Next up is Overture PLA Professional in white…

In tension (X-Axis), the highest Yield measured was at 210C, but the curve was essentially flat from 210-240C… The layer adhesion (Z-Axis) was virtually constant from 230C up to 250, which is as high as I went… The Vertical sample was virtually identical in strength to the standard Overture PLA, and in the Horizontal direction, it was actually less… However, all the horizontal samples stretched after the yield point, rather than breaking right away… whereas the standard PLA broke above 240C… The Z direction had 63% of the strength of the X direction, which is pretty good from my results so far…

Bob

1 Like

Now we get to the interesting stuff I built this setup to test!.. I ran some Polymaker PA612 Carbon Fibre today, and it did not disappoint, being about 50% stronger than the best PLA… Here are the results… BTW, I am using a layer height of 0.25mm for the CF-Nylons, as a 60% minimum of nozzle diameter (I’m using 0.4mm) is recommend for carbon fibre…

The tensile strength in the horizontal (X) direction exceeded 13,000 psi… The vertical (Z) test coupon got to 5300 psi before breaking… All samples broke cleanly, with no noticeable stretch, as you would expect with carbon fibre… The pieces were very stiff… The X-direction peaked in strength at 270C, while the layer adhesion was pretty flat from 260-290C… Within those temperatures, the lowest yield occurred at 270C, but at 5080 psi, within 5% of the 5313 max, which on data from single coupons is probably within the region of being statistically equal…

Bed adhesion was a bit tricky… I used Garolite (FR4) which is basically printed circuit board, laminated glass fibre and epoxy… In fact, I got a piece of copper clad one-side (and used the back), I figured the copper back couldn’t hurt the heat distribution on the bed… I used 70C, with the first layer at 80C with a nozzle temperature of 270C, and had no problems once I found that combination… I didn’t try my PEI bed, but I probably should have… I had trouble with the retraction settings, the ones that gave the greatest strength were very stringy, and when I increased the retraction distance to clean up the prints, the outer surface was no longer smooth and the strength dropped in both axes… Strings are not that hard to remove, so for an engineering material where strength is everything, I’ll put up with them until I find a solution that doesn’t lose strength…

More CF filaments to come, it will be interesting to see if price corresponds to strength!..

Bob

Well, after a week of testing, I finally got good data for the 3DXTech PA6-CF-G3… I did my best to dry the filament in our oven (4 hrs @ 90C, as recommended) and keep it dry during printing (dry box with 50 grams of silica gel), but I have no doubt a heated dry box with the filament feeding directly into the extruder might yield better layer adhesion… I had a terrble time getting the print to stick to the bed, and finally ended up with a Garolite (FR-4) sheet, sanded with 220 grit sandpaper, and then a thin layer of Elmer’s PVA glue stick at 70C… The horizontal (X-axis) test was nearly as good as the previous CF-Nylon I tested, but the vertical (Z-axis) was much worse… At 230C, the first layer of the horizontal print stayed behind on the print bed, and I dropped one of the vertical coupons and it broke when it hit the floor!.. The recommend temperature range is 240-270C, and I can sure vouch for not going lower!.. Anyways, here are the results I got…

I had read that this product gained layer adhesion as the temperature increased, at it was indeed the best at 280C, but less than half what I got with the other CF-Nylon I tested earlier, and worse than all the better PLA’s and PETG’s I have tested so far… Considering the cost (in Canada it is $86 per 500 grams), I was hugely disappointed… The print quality was very poor, especially as I increased the temperature, starting to string badly at 260C and getting worse the hotter I went… If the trick with this filament is to feed dry filament directly into the printer, that is beyond what I can do at the present time, and it was so fussy, I’m giving up on it…

Bob

I tested some Anycubic standard PLA today, in Grey… It ended up being the strongest PLA I have tested so far…

The yield point on the Horizontal (X axis) coupon was over 9000 psi at all temperatures from 200-240C and a very flat curve… In the Z-axis (Vertical), it peaked at nearly 6000 psi at 220C, the next best so far was the Overture PLA at 4750 psi… At 63% of the Horizontal strength, the layer bonding of this Anycubic PLA is great performance… I don’t know if other colours are the same, of course, but the Anycubic Silk Silver I tested earlier was about 8500 in the X-axis, but only just over 2000 layer-to-layer in Z… I presume the “Silk” additive reduces the bonding strength between layers…

Bob

I keep hoping that I will find a Carbon Fibre filament that has a greater layer-to-layer strength (Z-axis) that is closer to what can be achieved in the horizontal (filament) X-axis… I can’t afford to play with the $500/roll blends, and it seems to me that CF strands (not ground up dust) should be capable of beefing up the stiffness in a filament like PETG that is not known for it, and they are not terribly expensive… So, I ordered a couple more brands, and today I tested the IEMAI PETG-CF… Here are the results…

It was slightly stronger in the X direction than the other PETGs I have tested, at just over 7,000 psi, but the vertical layer-to-layer bonding was the same, at about 3,700 psi… This is weaker than PLA in both directions… One other thing I noticed with this filament is that in line with the filaments the strength increased with lower temperatures, which I have not seen before… I suppose it might be even stronger at 210C, but the layer bonding (which peaks at 250C) is so poor at 220C there was no point in going lower… I have some Kimya CF-PETG on the way, hopefully one of these will be better…

I was using my new coupons to test this, after confirming that they don’t influence my results, and I am very pleased with the consistency and mode of failure the provide…

Bob